About the business portal
Welcome to the Vipps MobilePay business portal! This is your central hub for managing sales units, API keys, users, and all business operations.
Business portal URL: portal.vippsmobilepay.com
For questions not covered in this guide, visit help.vippsmobilepay.com and select your country and language in the header menu.
Available in: 


Log in
Choose your preferred login method based on your location and company setup:
- 🏢 Single Sign-On
- Denmark
- Finland
- Norway
- Sweden
Best option for businesses - If your company has configured SSO, this provides the easiest and most secure access.
Available methods:
- MitID (recommended)
- Email and password
Available methods:
- FTN (Finnish Trust Network)
- Email and password
Available methods:
- BankID (required)
Special requirements:
- Must be invited by an admin from Denmark, Finland, or Norway
- Ask your admin to add you as a user
- Once invited, you can log in with BankID

Single Sign-On
Transform your team's portal access with enterprise-grade authentication that integrates seamlessly with your existing business systems.
Why choose SSO?
SSO empowers businesses to streamline authentication while maintaining the highest security standards:
- Efficiency & convenience
- Administration & security
- Flexibility & compliance
Seamless integration:
- Log in as easily as accessing your everyday business tools
- Instant portal access using your company's existing credentials
- Eliminate the need for personal eID in daily operations
Centralized control:
- Automatic user deactivation when employees leave the company
- Built-in Multi-Factor Authentication (MFA) and account lockout protection
Broader accessibility:
- Perfect for employees uncomfortable using personal eID for business
- Supports team members without eID from NO, DK, FI, or SE
- Maintains regulatory compliance for critical actions
Important limitations
- Ordering products and signing agreements will always require eID verification (regulatory requirement)
- Recommended: Maintain at least one administrator with eID access as backup
- SSO users cannot delete eID user administrators or change settlement accounts
Getting started
Ready to enable SSO? Contact our team: sso-support@vippsmobilepay.com
How SSO works in the portal
Once you've enrolled with SSO, here's what changes in your portal experience:
Portal updates
- Your User management pages will include new SSO options
- All standard user roles and permissions remain available
- SSO users have the same capabilities as eID users (with noted exceptions)
User invitation process
- Create invitations through the portal as usual
- Include all standard options (same as eID invitations)
- Invited users receive email notification of new access
- Users can select SSO option during login
Migrating existing users
- Delete current user accounts
- Create new user accounts with SSO login enabled
- See: How to add a user
Technical requirements and limitations
Supported SSO providers:
| Provider | Technology | Status |
|---|---|---|
| Microsoft Entra ID | OIDC | ✅ Fully supported |
| Okta Workforce Identity | OIDC | ✅ Fully supported |
If you don't have one of these login methods or need access to a different merchant, please contact customer service for assistance.
Why eID is still required for some actions:
- Legal identification requirements beyond SSO capabilities
- Regulatory compliance for financial services
- Enhanced security for critical business operations
Best practice: Always maintain at least one admin with eID access as backup.
SSO users cannot:
- Order new products
- Create and sign business agreements
- Change settlement accounts and frequency
- Delete eID user administrators
Implementation process
Step 1: Initial contact
Email sso-support@vippsmobilepay.com to begin the enrollment process.
Step 2: Requirements
By enrolling, you agree to:
- Enable Multi-Factor Authentication (MFA) in your Entra/Okta tenant
- Set up Account Lockout with reasonable thresholds (recommended: 5 failed attempts)
- Accept responsibility for user investigations when incidents occur
- Provide technical details about your Entra/Okta setup during the email process
Step 3: Implementation
- Our team will guide you through the technical setup
- We'll request specific details about your SSO configuration
- Implementation and testing phase
- Go-live and user migration support
Pricing
Simple, transparent monthly billing:
| Currency | Monthly Cost |
|---|---|
| 🇩🇰 DKK | 1,100 |
| 🇳🇴 NOK | 1,750 |
| 🇪🇺 EUR | 150 |
Order a product
Get started with Vipps MobilePay by ordering the payment solutions that best fit your business needs.
Use our Solution wizard to find the best payment solutions for your specific business needs.
Have a look at the help pages on help.vippsmobilepay.com.
Most product orders require manual setup on our end. Please allow up to 10 working days for activation.
New customers
First time with Vipps MobilePay? Start here:
- Create a merchant agreement - Submit your business information through the portal
- Use our recommendation wizard - Get personalized product suggestions based on your business
- Complete the setup - Follow the guided process to activate your account
Existing customers
Already have a merchant agreement? Add new solutions:
- Navigate to solutions - Select Order solution from the sidebar
- Choose your product - Browse available payment solutions
- Complete the order - Follow the online instructions to add new capabilities
Manage users
Find user information
Locate and view details for both production and test users in your portal.
- Production users
- Test users
Finding production users:
- Navigate to User accesses in the sidebar
- Browse the user list or use search to find specific users
- Click the user's name to view detailed information
What you'll see:
- User roles and permissions
- Sales unit access
- Login method (eID, email, SSO)
- Last activity
Finding test users:
- Click For developers from the sidebar.
- Select the Test users tab
- Browse the list of available test users
- Click the user's name to view detailed information
Important information:
- National Identity Number (NIN) is displayed for each test user
- Use this NIN with the test app for testing
- Phone numbers are automatically generated
Add a new user
Grant portal access to team members, partners, or external users with customized permissions and access levels.
- Production users
- Test users
Merchants can create user accounts for colleagues, accountants, partner employees, or any individual who needs access to sales units.
Steps to add a production user:
- Access user management - Select User accesses from the sidebar
- Choose login method - Click Add user and select the authentication type:
- National Identity Number (eID)
- Phone Number
- Single Sign-on (if configured)
- Enter personal information - Fill in user details and click Next
- Set permissions - Configure the user's role and permissions
- Add Access and manage API settings for developers
- Choose appropriate access level for their responsibilities
- Click Next
- Assign sales units - Select which sales units they can access
- Complete setup - Click Complete to finalize the user account
Important reminder: Notify the new user when registration is complete so they can log in immediately.
Access policy:
- Access is granted to individuals only (not businesses)
- No limit on the number of users you can add
- Each user needs specific permissions for their role
Additional resources:
Merchants can create test accounts for people who want to use the Merchant Test (MT) environment for testing Vipps MobilePay APIs.
Steps to add a test user:
- Click For developers from the sidebar.
- Access test users - Select the Test users tab
- Create new user - Click Add a new test user (if available)
- The system will automatically generate a phone number and NIN
Need help?
If you've reached the maximum number of test users or encounter any issues, contact our support team.
Update user permissions
Modify user access levels and permissions to control what they can see and do in the portal.
Steps to update permissions:
- Find the user - Locate the user in your user management section
- Access user options - Hover over the three dots (⋯) at the end of the user's row
- Edit permissions - Select Edit permissions from the dropdown menu
- Update access levels - Modify the user's permissions as needed:
- Administrator - Full access to all portal functions
- Assistant - Limited access for daily operations
- Developer - Access to API keys and technical settings
- Custom roles - Tailored permissions for specific needs
Need help choosing the right permissions? Check our permission levels guide for detailed explanations of each role.
Additional resources:
Change the administrator in the portal
- Administrator leaving
- Planned transition
Current administrator has left or is unavailable:
- Single administrator? - Contact customer service immediately
- Multiple administrators? - Another admin can manage the transition
- No access? - Customer service can restore administrative control
Always maintain at least one active administrator.
Transitioning to a new administrator:
- Add new administrator - Create admin access through User accesses
- Verify access - Ensure new admin can access all functions
- Remove old admin - Only after confirming new admin works
Delete your profile and data
- Through company admin
- Through customer center
Ask your company administrator:
- Contact any administrator in your company
- Request profile deletion from the User access section
- Access will be removed immediately
Usually the quickest way to remove access.
Contact support directly:
- Reach out to customer center
- Request complete profile and data removal
- All data will be deleted or anonymized
Troubleshooting
A user can't see the Developer section
Quick solution: This is typically a permissions issue.
How to fix:
- Verify user permissions - Check that the user has the correct access level
- Update permissions - Grant Developer access for the sales unit
- Contact administrator - If you can't update permissions, ask your Administrator for help
A user can't access the portal
Issue: User unable to log in or access portal features.
Troubleshooting steps:
- Check user permissions - Verify the user has appropriate access rights
- Verify login method - Ensure they're using the correct authentication (eID, email, SSO)
- Review user status - Confirm the user account is active and not expired
- Contact administrator - If issues persist, administrator intervention may be needed
Helpful resources:
Manage sales units
How to find a sales unit
To find a production sales unit
Click the See all link in the sidebar. You'll see a list that you can filter by typing in the name or number of the sales unit.
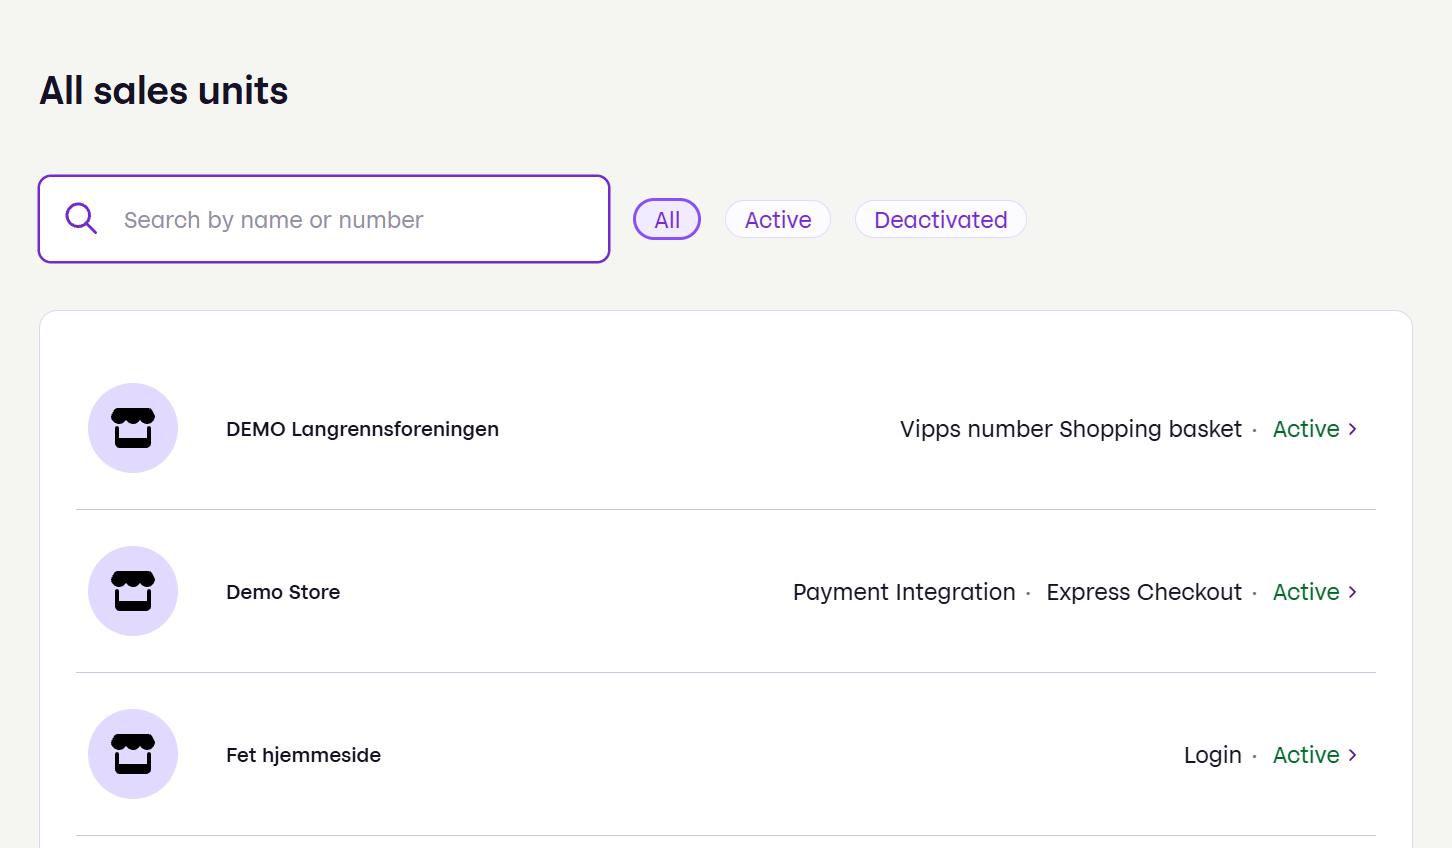
Click the name to get more information.
To find a test sales unit
Click For developers from the sidebar.
On the page that opens, you should see a list of sales units. On the API keys tab, select the Test environment.
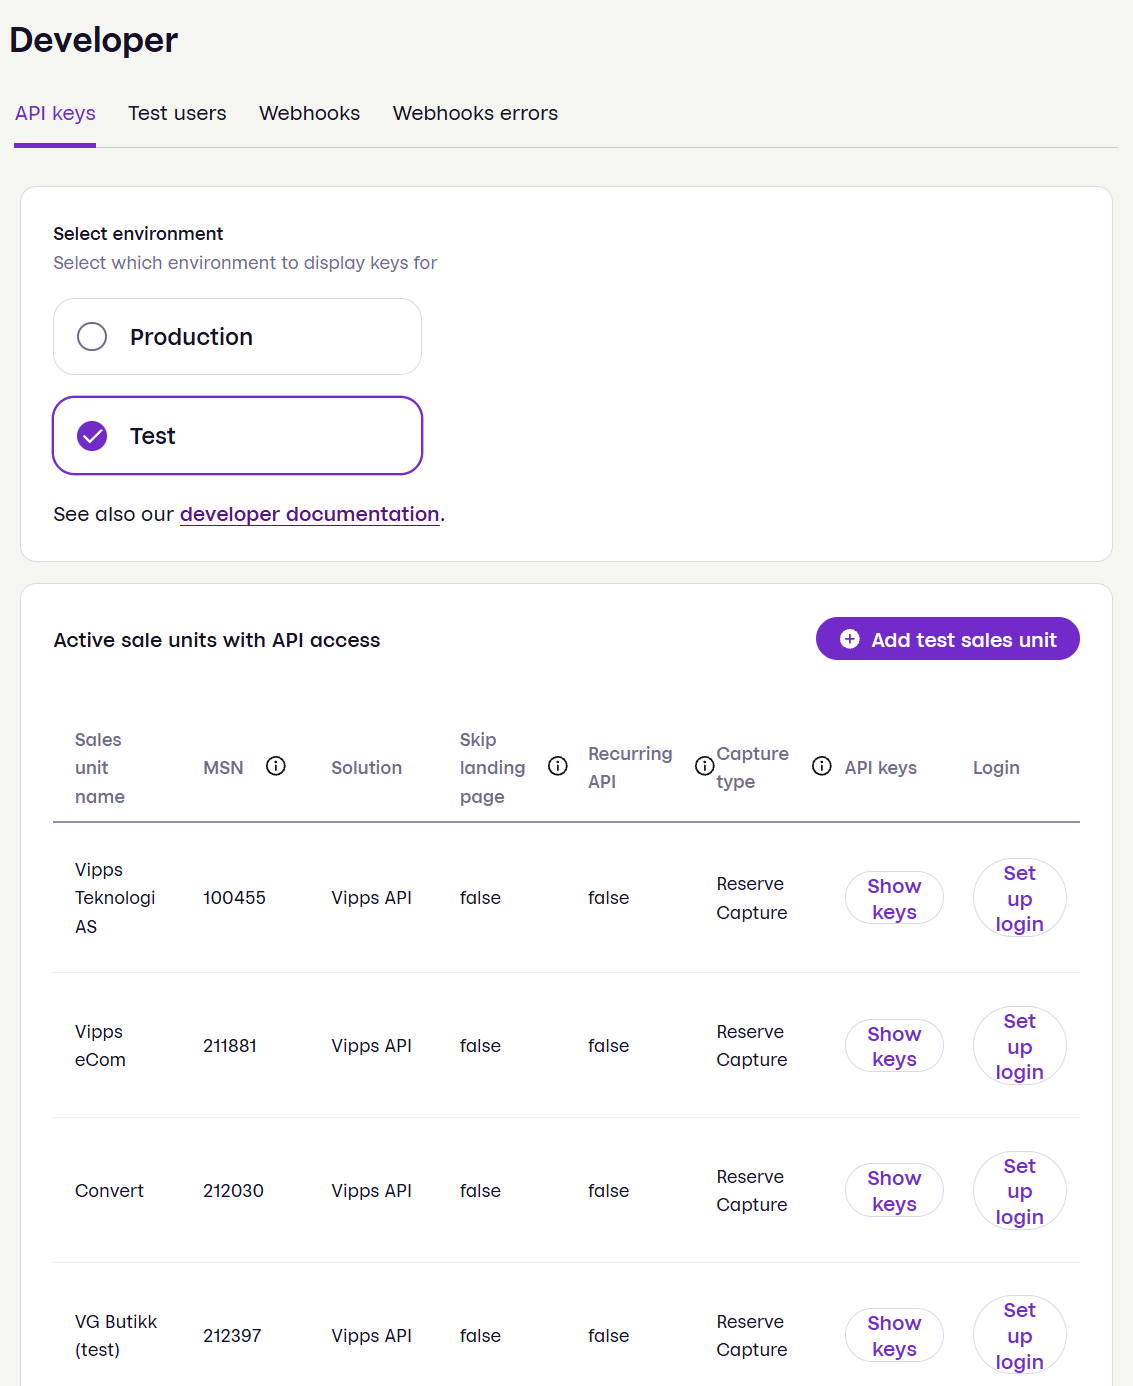
Find the sales unit name in the table. You can find the MSN and other details for this sales unit.
How to find the API keys
API keys are used for authentication with the API platform. These are credentials that confirm your identity and that your API request is valid.
You can get these on the business portal by logging in and following these steps:
-
Click For developers from the sidebar. On the page that opens, you should see a list of sales units. Select Test or Production.
-
Find your sales unit and click the corresponding Show keys button.
A panel will open where you can copy the values of each key. -
Take a copy of the MSN as well, as part of your API credentials.
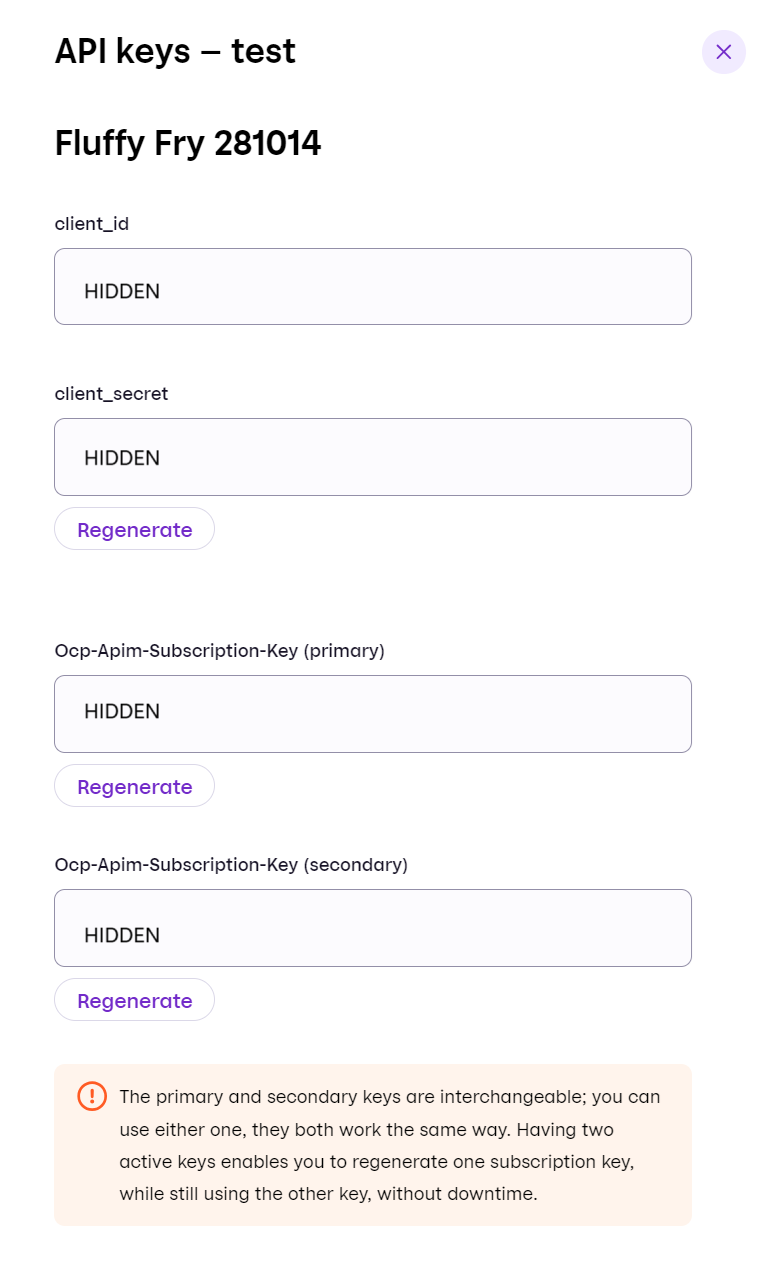
API keys are sensitive information, so handle them carefully:
- Vipps MobilePay will never ask for your API keys, and you must keep them secret.
- Always send API keys by encrypted email.
- Merchants: If you accidentally share your API keys, you must regenerate them immediately.
- Partners: For keys other than merchant API keys, contact the partner team. For merchant keys, the merchant needs to regenerate them.
- Update your integrations, so they will continue working.
If you need to transfer API keys to someone, make sure to do it securely. If they can't be moved securely, you can create a portal user for that person and give them basic access to the sales unit.
A Vipps MobilePay partner should use Partner keys, and not the merchant keys. If a partner can't get partner keys, there are two solutions:
- The merchant can securely send their keys to the partner.
- If the merchant is unable to provide the API keys to the partner securely, they can add a user for the partner and give them Assistant access. Then, the partner can log in to the portal and download the API keys.
Some in-person solutions, such as Donations, use merchant level keys. See merchant level keys for details.
How to regenerate API keys
If your API keys have been compromised or accidentally shared, you must regenerate them immediately to protect your account.
Regenerating your API keys will immediately invalidate the old keys. Make sure to update all your integrations with the new keys to avoid service interruptions.
Steps to regenerate API keys:
- Click For developers from the sidebar.
- Select Test or Production environment, depending on which keys you need to regenerate.
- Find your sales unit in the list.
- Click the Show keys button to open the keys panel.
- Click the Regenerate button (usually located near the key values).
- Confirm that you want to regenerate the keys when prompted.
- Copy your new API keys immediately.
- Update all your integrations and systems with the new keys as soon as possible.
After regenerating keys, test your integration to ensure everything works correctly with the new credentials before going live.
Some in-person solutions, such as Donations, use merchant level keys. See merchant level keys for details.
How to find the Merchant Serial Number
The Merchant-Serial-Number (MSN) is a unique identifier assigned when a sales unit is created.
You can optionally include it in the header for each API request to help us with problem-solving.
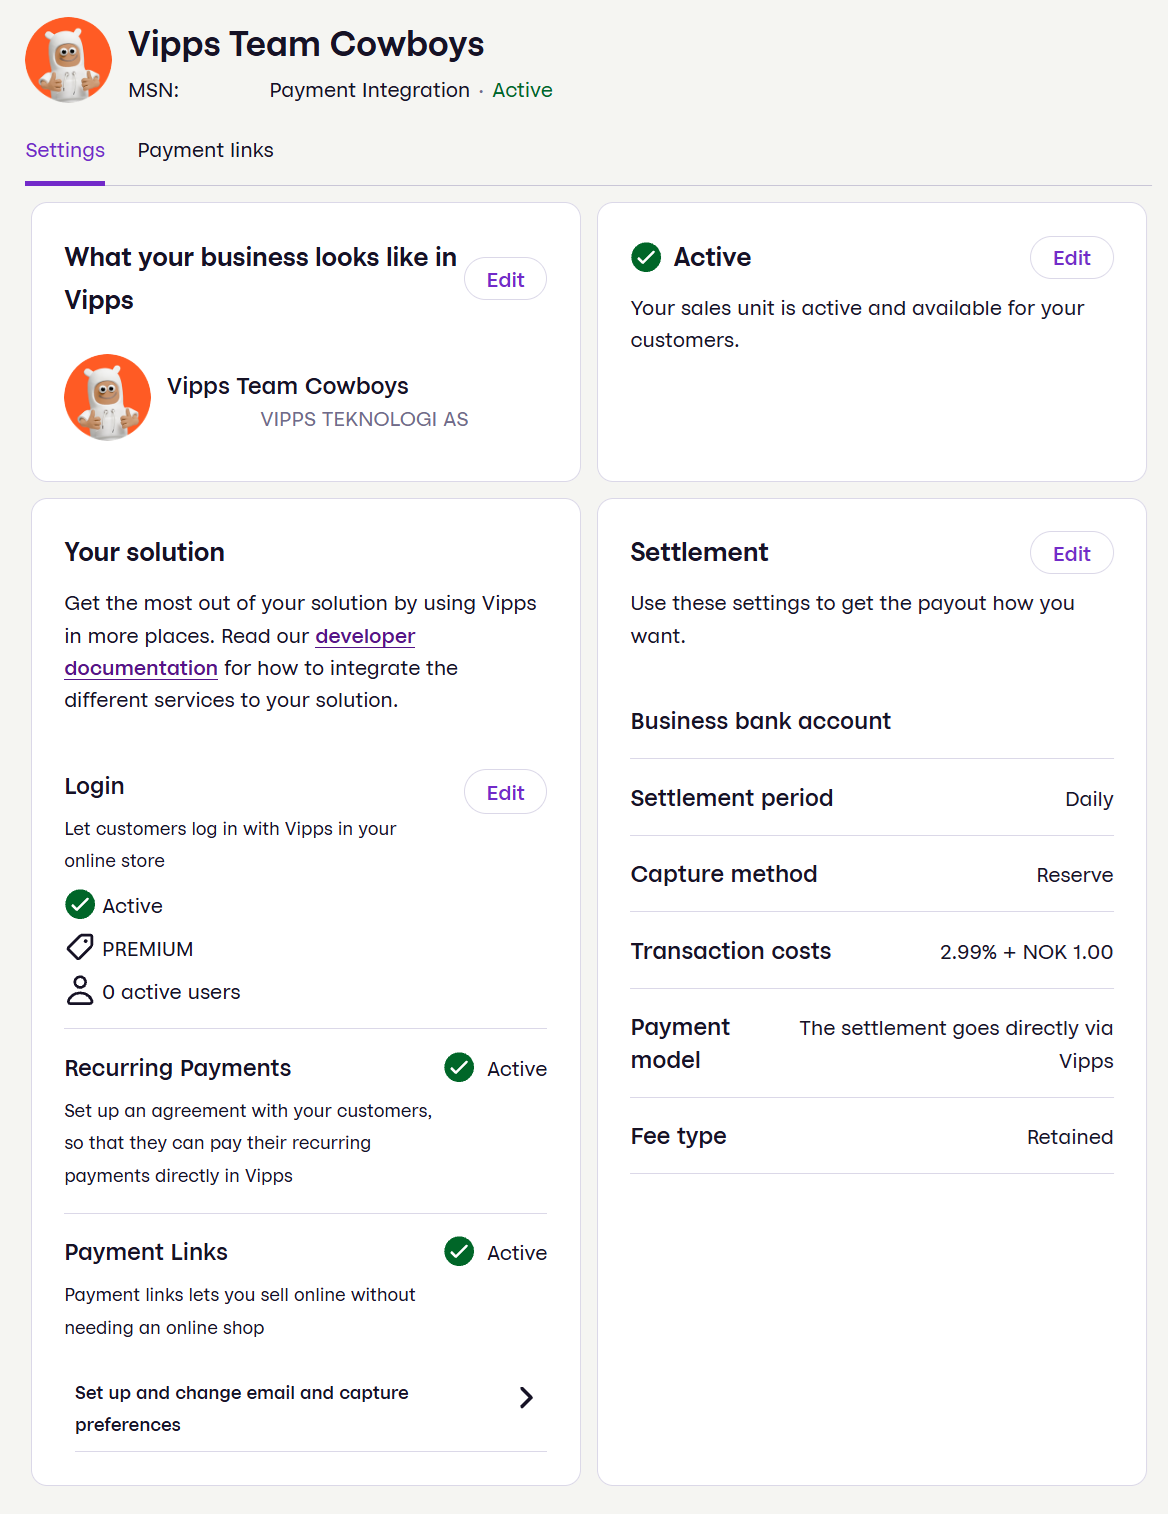
Find your desired sales unit and the Merchant Serial Number (MSN) is displayed to the right of the sales unit name. You can also find the MSN and other details on the page displayed by clicking the sales unit name or the Show keys buttons.
You can have multiple sales units which can be managed in the portal. You can change the logo, name, or account.
The Merchant Serial Number is the ID of the sales unit, not the merchant. Note that this cannot be changed after creation. We usually refer to it as "MSN" to reduce confusion.
How to add a new sales unit
For a production sales unit:
- Go to Order solution in the sidebar.
- Select the product type (which decides the type of sales unit) you want to add.
- Fill out the necessary information.
This requires some manual work on our end, so please allow up to 10 working days.
Benefits of having multiple sales units:
- Each sales unit has its own name presented to the user in the app
- Each sales unit has separate transaction logs
- Each sales unit can have its own settlement account. Sharing a single account across multiple sales units is available on request.
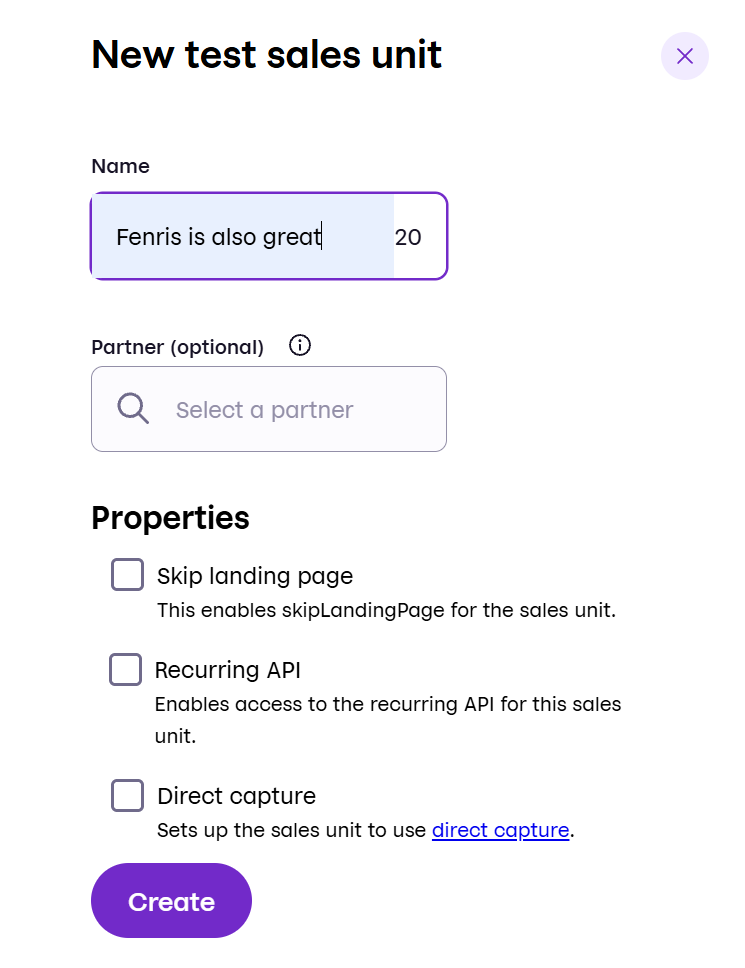
How to create a test sales unit
For a test sales unit:
-
In the For developers section.
-
On the page that opens, you should see a list of sales units. On the API keys tab, select the Test environment.
-
Click Add test sales unit.
-
Enter the requested properties and click Create.
- Name - The name of your test sales unit.
- Partner - Optional partner data (not usually needed).
- Select optional properties:
- Skip landing page - To use this in production, you will need special permission.
- Recurring API
- Direct capture
After a couple of minutes, your new test sales unit will appear in the bottom of the list (possibly after some browser refreshes). Then, you can get the API keys and begin testing.
You cannot change an existing sales unit in the test environment, but you can create as many as you need.
How can I change my name and logo?
For production sales units, the name and logo is shown to users in several places, both in the app and elsewhere. You can change these on the sales unit page.
Once you have found your sales unit and opened the information panel, click the Edit button beside What your business looks like in [Vipps or MobilePay].
For example:
![]()
Note that you cannot change the name of a test sales unit.
How to deactivate a sales unit
To deactivate your sales unit, find the sales unit and click the Edit button in the Active field. From there, you can deactivate the sales unit.
Payment Insights
The Payment Insights page provides merchants and partners with analytics on key business metrics, including:
- Transaction volume and trends
- Payment success rates
- Conversion rates across sales units
- Integration performance benchmarks
Use these insights to monitor the quality of your Vipps MobilePay integration, compare performance across different sales units, and identify areas for improvement.
See also: Payment insights for partners.
Configure products
Login
How to set up Login for your sales unit
This is for production sales units. Test sales units can't be updated, but you can create a new test sales unit.
For partners, please email partner@vippsmobilepay.com the following information:
- Partner name
- Merchant sales unit ID
- Redirect URIs - Specify the URI that will be used with
the query parameter,
redirect_uri, on the initial request to theauthenticationendpoint. You can register as many URIs as you want. This creates a list of accepted URIs. For more details, see the Login API FAQ.
Merchant instructions:
-
Go to For developers in the sidebar.
-
Find your production sales unit in the list and click the Set up login button corresponding to it. Then, you will see the Login configuration page.
-
If this is the first time, click Activate Login. The Login overview page will open. Then, in the Settings section, click Edit and fill out the fields:
-
Redirect URIs - Specify the URI that will be used with the query parameter,
redirect_uri, on the initial request to theauthenticationendpoint. You can register as many URIs as you want. This creates a list of accepted URIs.See Login API FAQ for details.
- Enter the URI. It must be exactly the same URI that you use when making API requests.
Take care to notice if the actual URI is specified with a trailing slash
/or not. For testing, you can usehttp://localhost. - Click Add URI for each URI you add.
- Click Save.
- Enter the URI. It must be exactly the same URI that you use when making API requests.
Take care to notice if the actual URI is specified with a trailing slash
-
This setting will then apply to all login transactions on this sales unit.
How to configure text for merchant-initiated login flow
- Click the Set up login button corresponding to your sales unit.
- The overview page will open. In the Settings section, click Edit
- Under Text type for merchant initiated login flow, select from these options.
- Join customer club
- Share information
- Confirm information
- Click Save
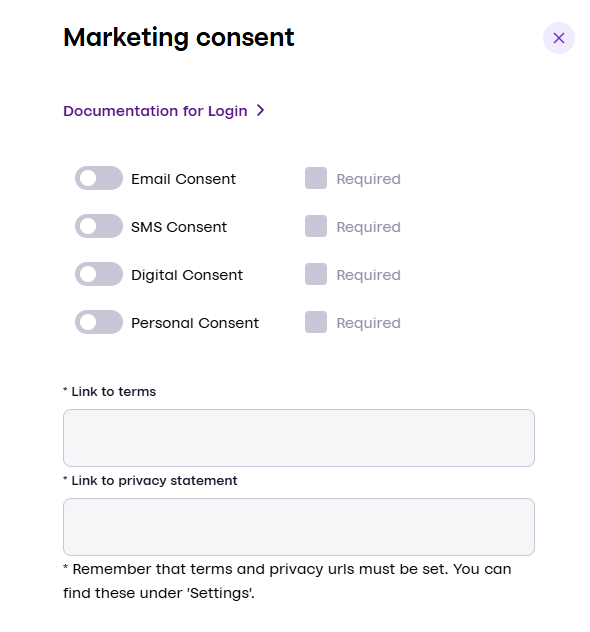
How to configure marketing consents for Login
This is for production sales units. Test sales units can't be updated, but you can create a new test sales unit.
Before adding marketing consents, you need to add URLs for your terms and privacy statement:
- Click the Set up login button corresponding to your sales unit.
- The Login overview page will open. In the Settings section, click Edit
- Under Terms and privacy statement, add the URLs.
- Click Save and go back to the Login overview page.
Then, configure marketing consents:
- From the Login overview page, in the Marketing consents section, click Edit.
- Select at least one consent type.
- Decide which consents are mandatory.
- Click Save.
Recurring payments
How to add recurring payments
Adding recurring payments is simple:
- For production sales units: You can request recurring payments for existing production sales units.
- For test sales units: You can't update an existing test sales unit, but you can create a new one and enable recurring payments during its creation.
To add recurring to an existing production sales unit:
- Find the sales unit you want to update.
- Click on the title to open the sales unit's properties.
- Under Your solution, under Recurring Payments, select Add.
- Fill out the form with an estimate of your revenue and a description of what types of services you will be offering. Estimations are fine, and we will contact your if it's unclear.
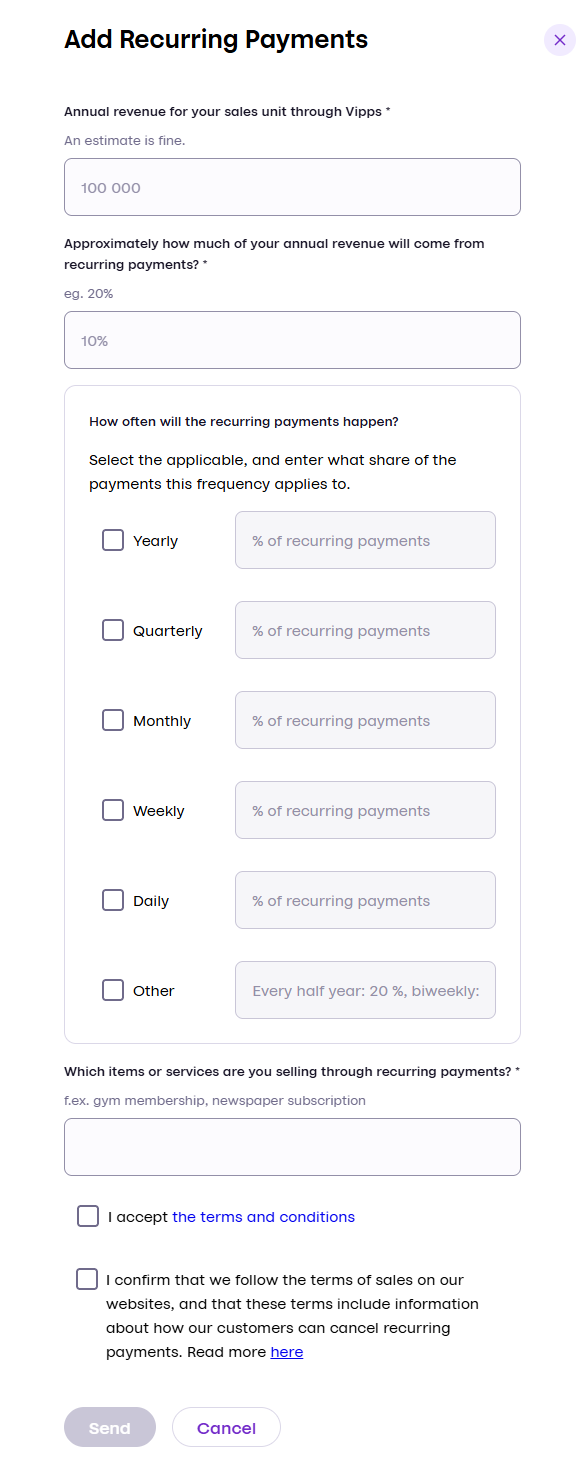
Once your application is submitted, please allow a few days for processing. Since recurring payments involve increased risk, we may require additional information and evaluations before enabling this feature on your profile.
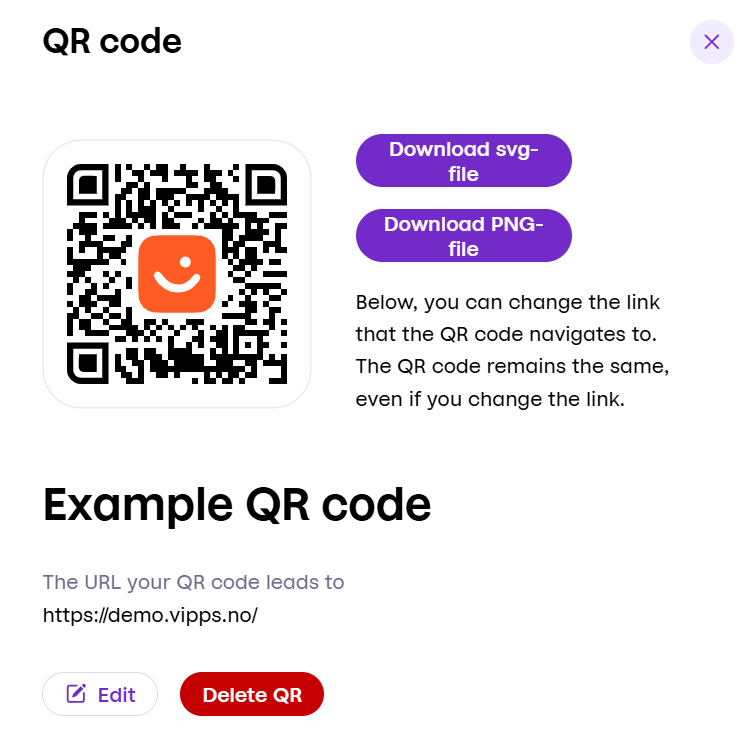
QR codes
How to generate a Vipps MobilePay branded QR code
You can also generate these QR codes via the QR API: Merchant redirect QR codes.
-
Click Scan and pay in the sidebar top open the QR codes page.
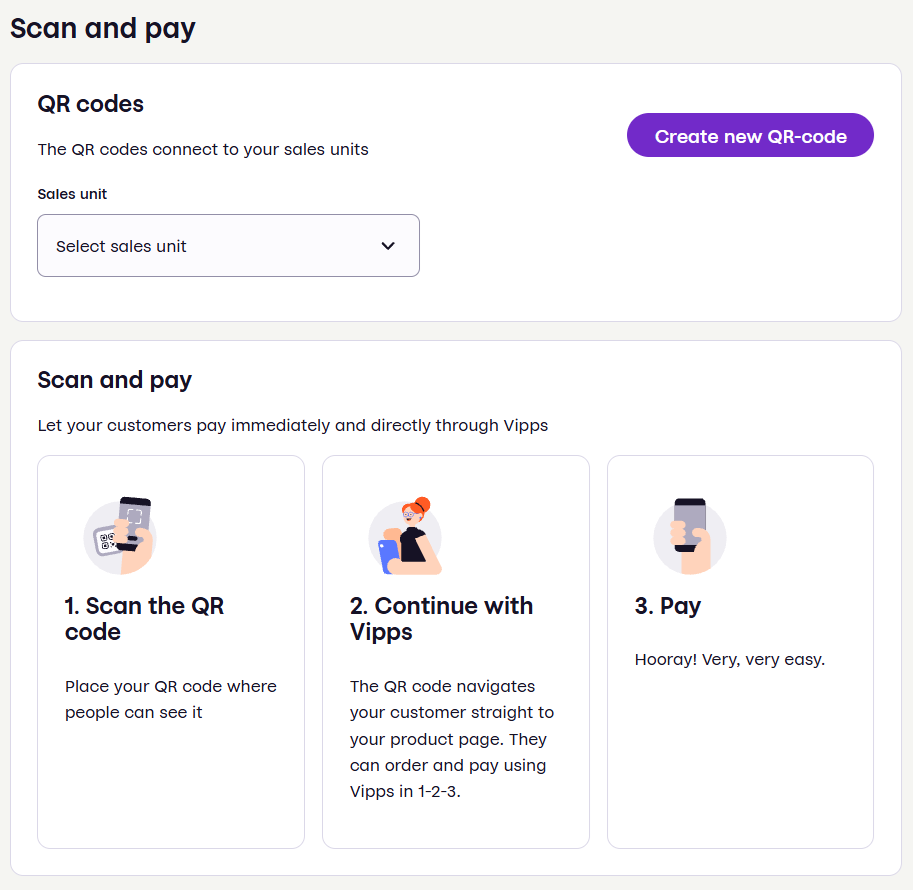
-
From the dropdown menu, select the sales unit you want to use.
-
Click the Create a new QR code button and the QR creation dialog will open.
-
Enter the name you want for the QR and the URL.
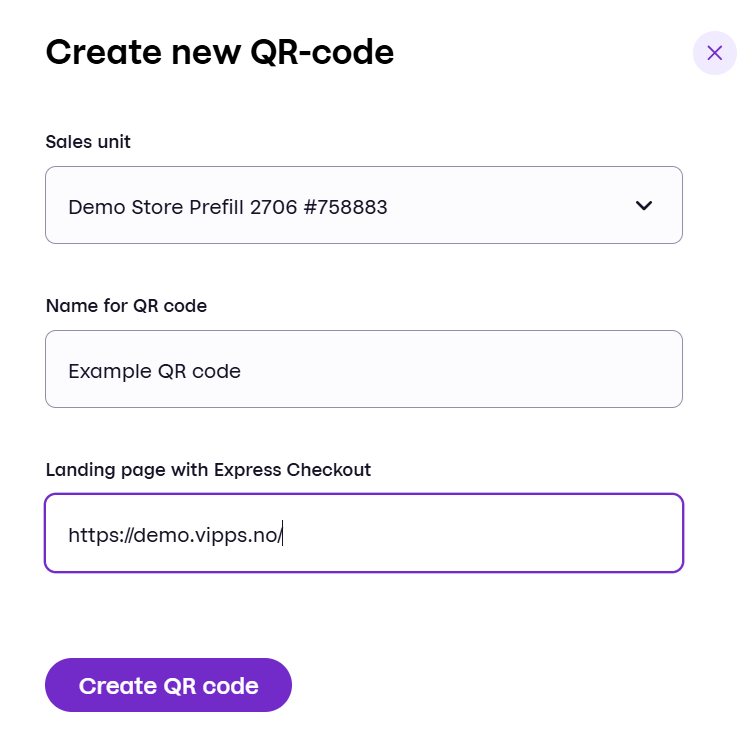
-
Click Create new QR-code.
-
Once the QR code is created, and you can download it in either SVG or PNG.
Payment links
Payment links provide a simple and efficient way for merchants to collect payments from customers. By sharing a URL, merchants can enable customers to make payments without requiring complex integrations or custom-built payment pages.
For more details, see Payment links.
Webhooks
View registered webhooks
Click For developers from the sidebar. From the Developer page, click the Webhooks tab.
You can view the webhooks you've registered with the Webhooks API for all your sales units.
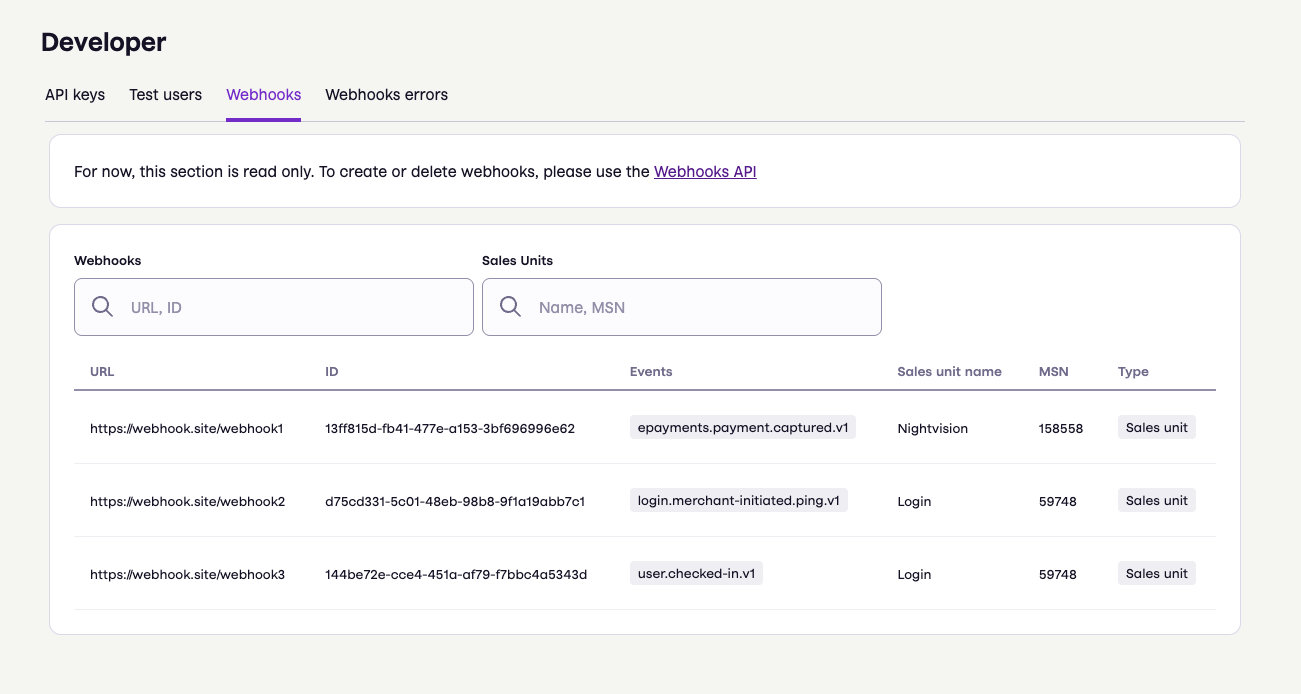
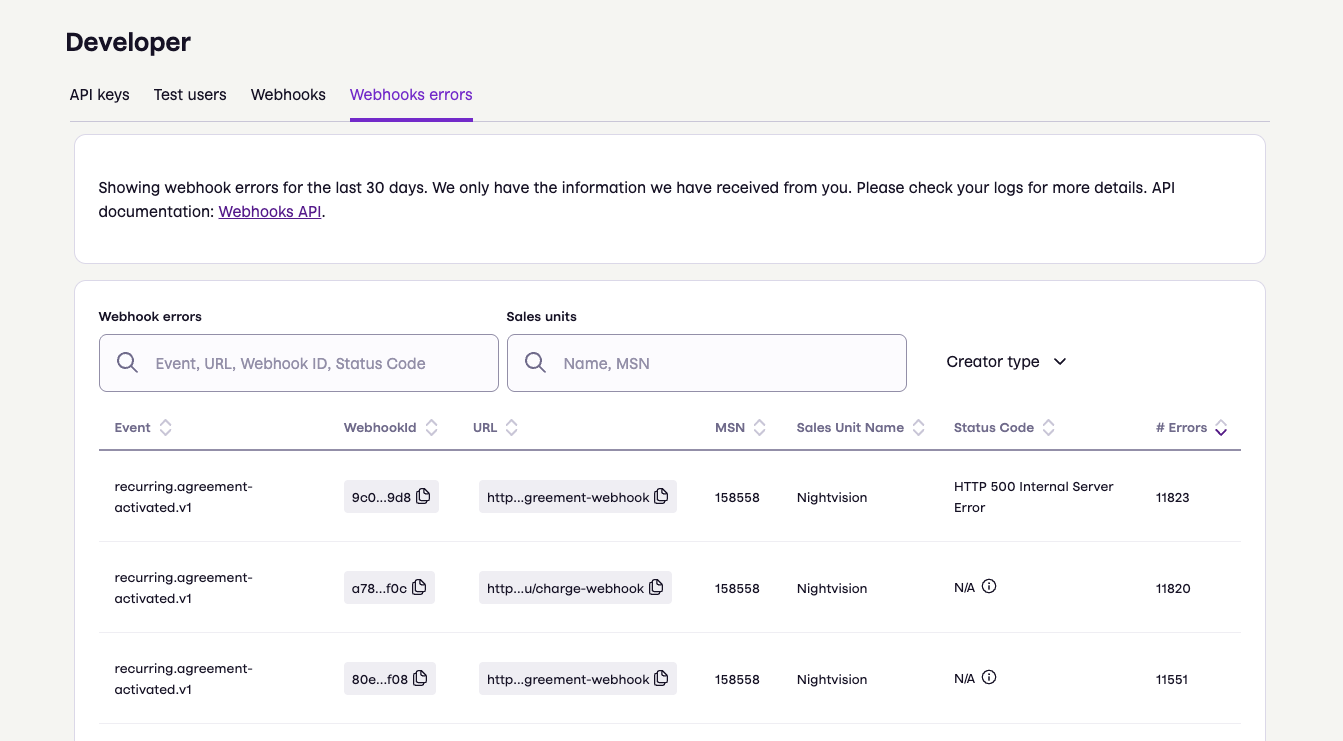
View webhooks errors
You can see the errors for these webhooks on the Webhook errors tab.
Partners: See the partner portal documentation:
Shipping
How can I set up shipping?
Shipping is not an option through the portal. This must be set up through your program code or through one of our APIs.
See: ePayment API
View transactions
You can view information about your payment transactions through the business portal.
For Sales transactions: Click Transactions in the sidebar.
For Transfers: Click Reports in the sidebar.
You will find more information about transactions 0n help.vippsmobilepay.com:
- Help: Overview of transactions, fees and settlements
- Help: Transaction statuses
- Help: When will I receive the settlement from you?
In addition, the Settlements section contains many details about payment processing.
Common questions about transactions
Can't find a transaction?
If you've initiated a transaction but can't find it in the portal:
- Check the correct sales unit: Make sure you're viewing the correct sales unit in the portal. If you have multiple sales units, the transaction may be under a different one.
- Wait for processing: Newly initiated transactions may take a moment to appear in the portal.
- Verify the transaction was completed: Check with your system or the customer to confirm the transaction was actually initiated.
For developers integrating with our APIs, see the technical troubleshooting guide: errorCode 35 "Requested order not found".
How do I change the frequency of settlements?
Settlements are paid daily by default. In the portal, you can change this to weekly or monthly.
Weekly settlements are paid out the following Monday. Monthly settlements are paid on the 1st of the following month.
Remember that depending on public holidays or weekends, it may take some time before the money arrives in the account.
See Can I change how often you are paying out?
How can I download transactions?
See Help: How to download reports
Please note: The Excel reports come in two versions: one with sender names and messages, and one without these details. If you download the version with sender names and messages, your company will become an independent data controller for the personal information contained in that report.
What do the different transaction statuses mean?
We divide transactions into different statuses to tell the company and the Vipps user what has happened to it. See:
How do I cancel a reserved transaction through the portal?
Currently only possible for Norwegian sales units and payment links.
Select the order you want to cancel, then click Cancel transaction. Confirm the cancellation. You'll see a confirmation screen. The reserved amount will be released on the customer's account immediately.
Capture a transaction in the portal
This is possible for transactions created with the ePayment API or Payment links.
Select the reserved order that you want to capture, then click Capture.
For a partial capture, enter the amount to capture. Otherwise, click the Capture button without adding an amount. You'll see a confirmation screen.
How do I make a refund through the portal?
This is possible for transactions created with an API from our API platform, Payment links, or the MobilePay Subscriptions API facade.
Select the transaction you want to refund, then click Cancel transaction. Confirm the cancellation. You'll see a confirmation screen. The reserved amount will be released on the customer's account immediately.
See Help: How to make a refund and other related questions.
Manage partner settings
How can I see which partner is selected for a sales unit?
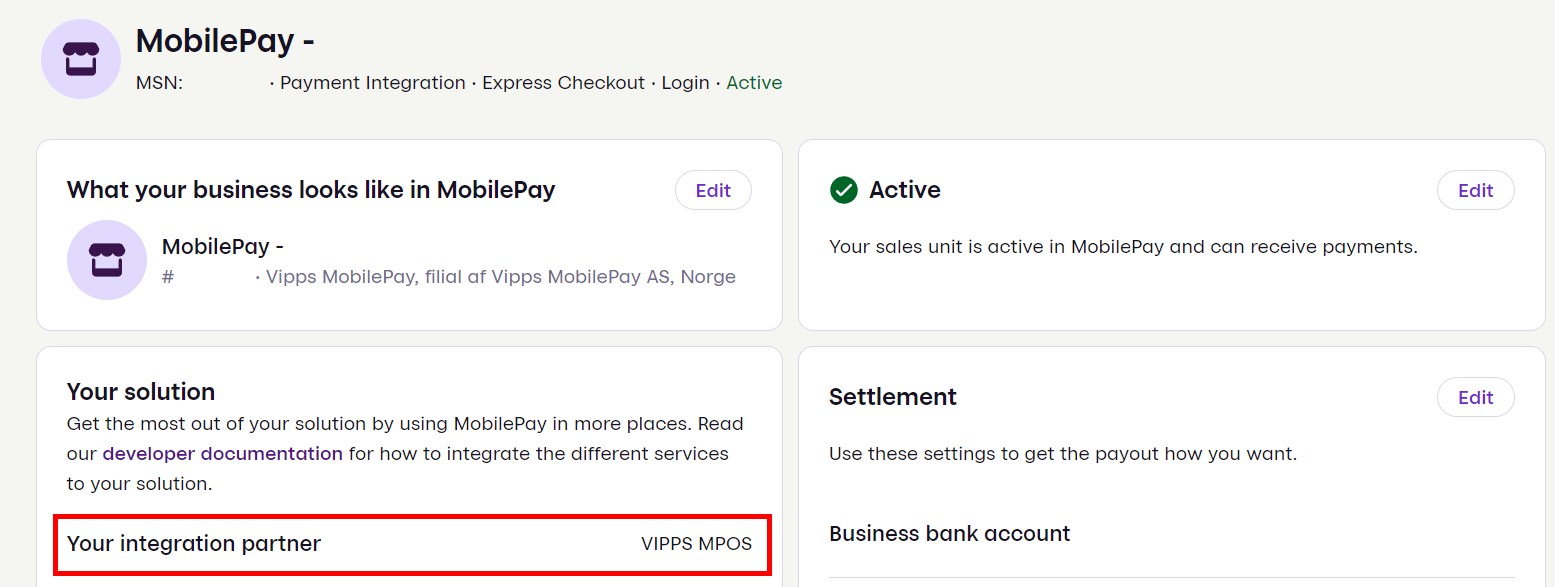
Navigate to the sales unit information. Under Your solution, look for Your integration partner to find the name of the partner. If the sales unit is not linked to a partner, the Your integration partner section will not be shown.
How can I change partner for a sales unit?
You cannot change the partner through the portal. See the How to change partners guide.
Is it possible to have two partners for one sales unit?
You can only select one partner for each sales unit. However, you can select one partner for your sales unit and share your API keys with a different partner. We don't recommend this approach because both partners will have access to the sales unit and can access and affect the same data. If you choose to do this, please inform both partners that another partner has access as well. The recommended approach is to create a new sales unit for each partner.
Is there a partner portal?
Yes! The partner portal helps partners manage their clients. See About the partner portal for more details.